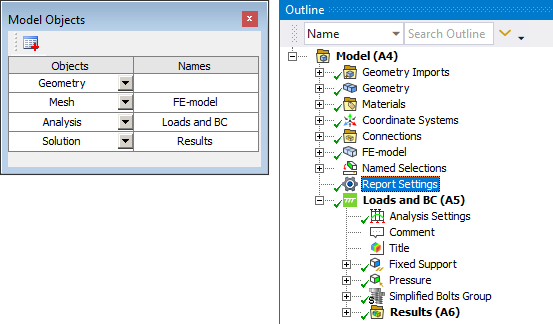
 Report Settings
Table of contents
About
All settings for the report creation is managed by the “Report Settings” object.
Usage
Click “Report Settings” to add the Report Settings object to the model tree.
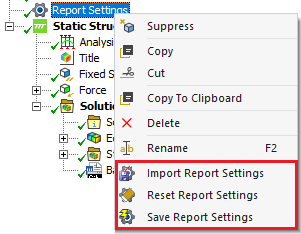
Existing data in the preference file “reportGeneratorPref.json” is used when the settings is added. Right-click on Report Settings to access the context actions:
- Import Report Settings from a selected previous version.
- “Reset Report Settings” to revert all settings to default values.
- “Save Report Settings” to update (and overwrite) the global preference file “reportGeneratorPref.json”. A pop-up question “Overwrite existing Report Setting defaults?” prompts the user to confirm or cancel the save.
(A backup copy of the app default values are saved in the file “reportGeneratorPrefDefault.json”.) - “Install License File” to fill in the license credentials from a license file.
- “Check Out License” to activate and check out the license.
- “Check License Status” to display current license information.
Import Report Settings
When updating/migrating from a previous version of Report Generator use the “Import Report Settings” to browse for the folder with the preference and Word template files.
The General Settings from the source folder (reportGeneratorPref.py and reportGeneratorPref.json) are loaded to the current Report Settings object. Additional Word template files (except for the default “ReportGenerator.dotm”) are copied to the app folder.
A pop-up window will confirm that the settings are imported and ask to inspected the changes before using the “Save Report Settings”.
If edits are made to the default report template file you must copy it manually to the new app folder. It is recommended to save your version of Word template to e.g. “CompanyReportTemplate.dotm”.
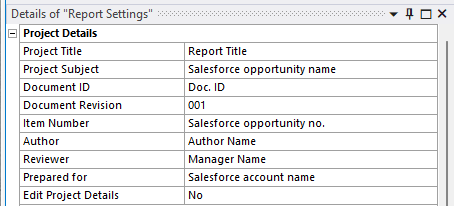
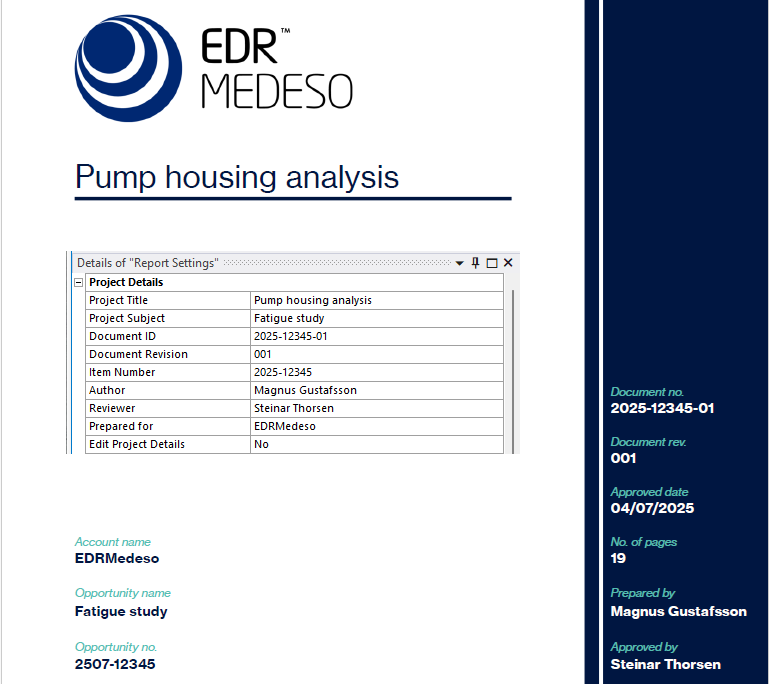
Project Details
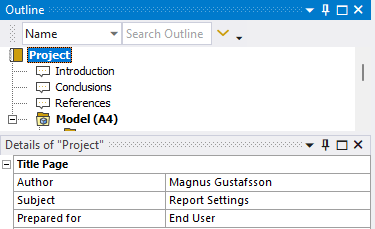
The “Details of Project” are now synced with the Report Settings object and custom properties can be enabled/disabled. The Project Details are mapped to corresponding “Word Built In Properties” and “Word Custom Properties” by using Word macro Document_New and the text file “reportGenerator.inp”, written in the Windows temp folder. Word Prop put in between brackets are not used in the current version of the macro.
| Project Details | Word Prop | Word Custom Prop | Description |
|---|---|---|---|
| Project Title | Title | Project Title. Defaults to the name of the “root” of the model tree. | |
| Project Subject | Subject | Project Subject or subtitle (i). | |
| Document ID | (Category) | document_id | Custom property. (ii) |
| Document Revision | (Revision) | document_revision | Custom property. (ii) |
| Item Number | (Keywords) | document_item_number | Custom property. (ii) |
| Project Last Saved | project_last_saved | Project Last Saved (Hidden). | |
| Product Version | (Comments) | project_product_version | Ansys Product Version (Hidden). |
| Author | Author | document_author | Project Author (i). |
| Reviewer | (Manager) | document_reviewer | Custom property. (ii) |
| Prepared for | (Company) | document_prepared_for | Project Prepared for (i). |
| Edit Project Details | - | Yes/No (Default) Editor to enable/disable custom properties. |
(i) The property updates the corresponding property in “Details of Project”.
(ii) Can be enabled/disabled in “Edit Project Details”.
The “Word Custom Prop” must be created using the “Add” button if not existing in the Word template before they can be used. See the section ReportGenerator.dotm for details on how to input these Fields.
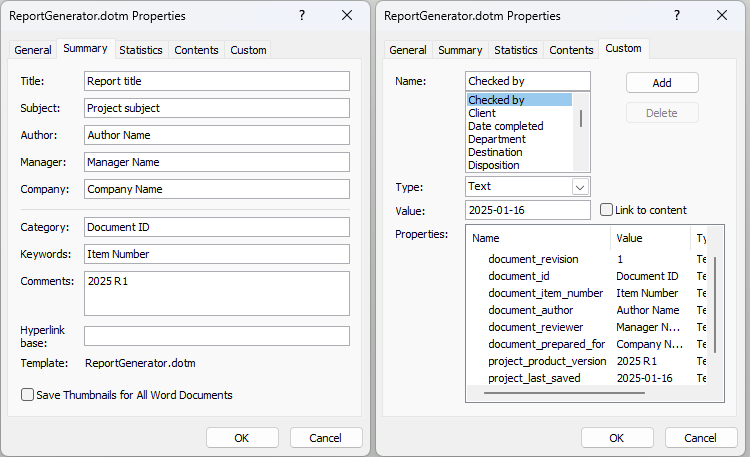
Starting in 2025 R2 the Project Details does support regional characters in the import to Word. It requires to add the function HTMLDecode and update the macro Document_New in the Word template to work. In previous versions you have to manually edit the “Properties” in the “Word>Info” page above.
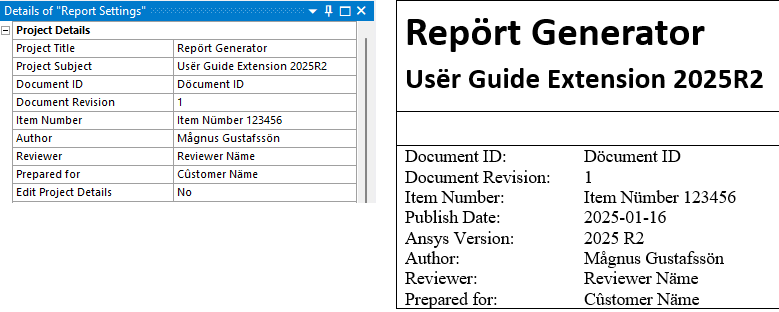
Default values for Project Subject, Document ID, Document Revision, Item Number, Author, Reviewer and Prepared for is saved when using “Save Report Settings” to allow easy identification when the Report Settings is added to the model and for how the properties are used in your customer Word template.
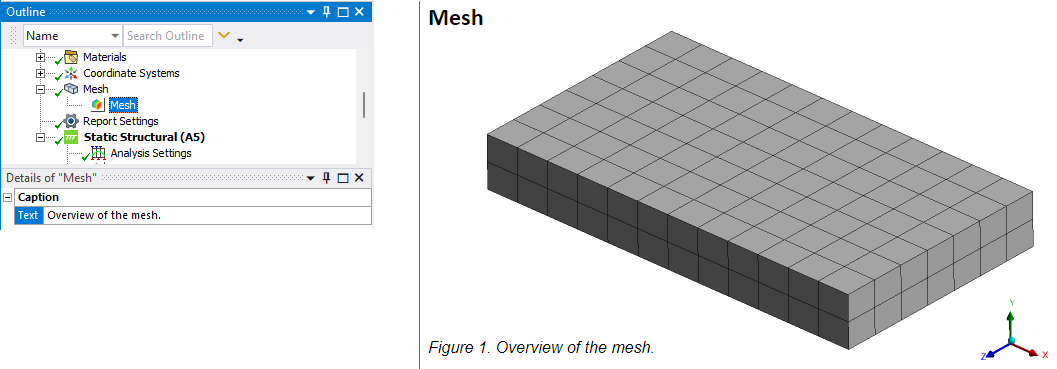
Values updated and resulting report.
Word Report Settings
| Word Report Settings | |
|---|---|
| Report Name | File name for Word/Html document |
| Report Path | Folder name for report. Default projects “user_files” folder. |
| Overwrite Report | Yes/No (Default) Set to “Yes” to overwrite without being prompted. |
| Word Template | Select one of the available Word report templates. |
| Use Word Template as Tag | Yes/No (Default) Set to “Yes” will Tag using the “Word Template” name instead of “Report”. |
| Use Word Template Font | Yes (Default)/No Set to “No” to use the Font Style Settings. |
| Get Parameters | Yes (Default)/No Set to “No” if not using parameter identifiers in comments. |
| Independent Report Draft | Yes/No (Default) Set to “Yes” to prevent Mechanical to be locked while editing. |
Report Name
The Report Name default is the “Project” plus “Subject”.
“FileName.docx” will use linked images. “FileName.doc” will use embedded images.
If using linked images in the report figures and images will only be visible as long as the project user_files folder exist. You may save the images in the Word document and keep the links, see the Figure Features section.
Report Path
The default report save location is the projects “user_files”. Click on the “user_files” field and then “Apply” to open a folder browser window to set the current output folder for the report and image folder.
To revert to the default folder “user_files” click on the path name and “Apply” and then click “Cancel”.
Overwrite Report
To disable the question to overwrite an existing report set “Overwrite Report = Yes”.
Word Template
Select the Word Template file to use. All macro enabled templates, “templateName.dotm”, saved in the extension folder are listed. The included Word template, ReportGenerator.dotm, can be edited by the user to modify front page, heading styles etc. The template is saved in the extension folder, e.g. “%appdata%\Ansys\v231\ACT\extensions\Report Generator V231.4”.
(i) The template uses Visual Basic to work together with Mechanical!
(ii) The Report Settings are saved individually for each Word Template.
Selecting a different Word Template will try to load and apply settings saved in the “reportGeneratorPref.json”.
Use Word Template Font
By default paragraph fonts are defined by the Word template. Set this property to “No” to disable the Word template paragraph font and use the styles defined in the Font Style Settings.
When exporting a Html report the “Font Style Settings” are always used.
Get Parameters
The use of parameters in the project may slow down the export due to a “memory leak” bug in Mechanical that may cause a crash. This is a Known Issue.
If the report is not using reference to parameters with the “_parameterTable_” or “_P1_” tag in “Comments” set “Get Parameters = No”. See the section Parameter Table.
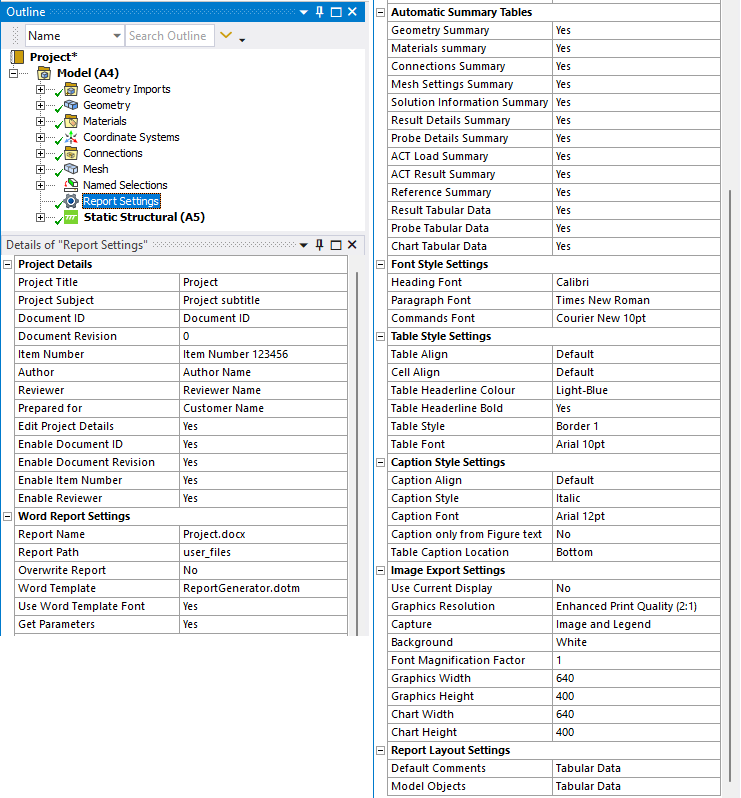
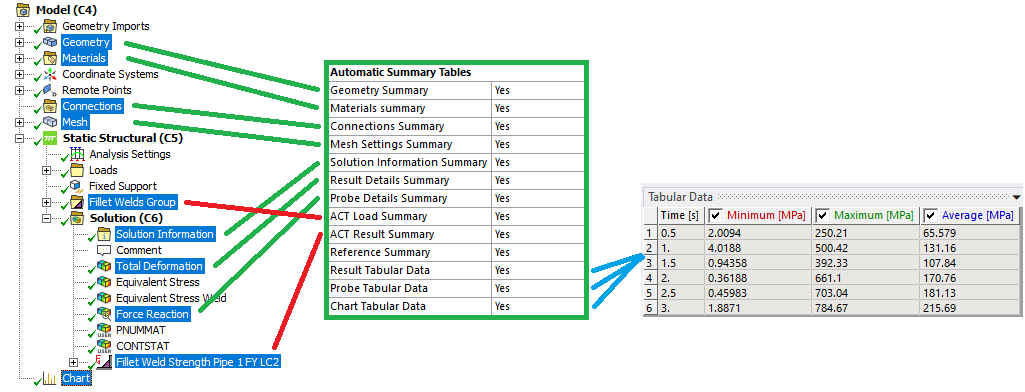
Automatic Summary Tables
The following summary tables are available to include in the report as default.
| Automatic Summary Tables | |
|---|---|
| Geometry Summary | Yes (Default)/No |
| Materials Summary | Yes (Default)/No |
| Connections Summary | Yes (Default)/No |
| Mesh Settings Summary | Yes (Default)/No |
| Analysis Details Summary | Yes (Default)/No |
| Solution Information Summary | Yes (Default)/No |
| Result Details Summary | Yes (Default)/No |
| Probe Details Summary | Yes (Default)/No |
| ACT Load Summary | Yes (Default)/No |
| ACT Result Summary | Yes (Default)/No |
| Reference Summary | Yes (Default)/No |
| Result Tabular Data | Yes (Default)/No |
| Probe Tabular Data | Yes (Default)/No |
| Chart Tabular Data | Yes (Default)/No |
Reference Summary is used by Bolt Report and Weld Report and prints notes and the reference to the used design codes.
Font Style Settings
| Font Style Settings | |
|---|---|
| Heading Font | Calibri (Default) |
| Paragraph Font | Times New Roman (Default) |
| Commands Font | Courier New 10pt (Default) |
The font and size settings used for heading, text and command objects in the Html (or Word) report is defined by Font Style Settings.
Selecting an item with only the font name uses the default size in Html (or Word), e.g. “Times New Roman”. Selecting an item with font name and size to override the default size, e.g. “Courier New 10pt”.
The available fonts are: “Default, Arial, Arial Narrow, Calibri, Courier New, Times New Roman”.
The available sizes are: “9pt, 10pt, 11pt, 12pt, 14pt”.
Tip: Start typing the name of a font to filter the list.
The available fonts and sizes can be edited in General Settings - Font Styles.
The font styles for Tables and Caption are defined in the corresponding section below.
Table Style Settings
| Table Style Settings | |
|---|---|
| Table Align | Default/Left/Center/Right Aligns the table on the page. |
| Cell Align | Default/Left/Center/Right Aligns the text in the cell. |
| Table Headerline Colour | Light-Blue (Default) Set header line colour from list. |
| Table Headerline Bold | Yes (Default)/No |
| Table Style | Border 0/Border 1 (Default)/Border 2 |
| Table Font | Arial 10pt (Default) |
The available Table Styles can be edited in General Settings - Table Styles.
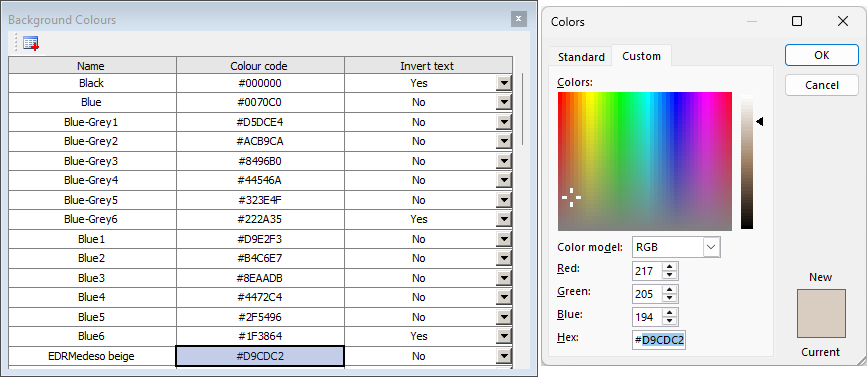
Table Headerline Colour
The colour set in the preference file is mapped to the default colors from the colour map below. If a custom colour is used the colour code is displayed instead. Selecting a darker colour will automatically reverse the text colour to white as shown below.
The available colours can be edited in General Settings - Background Colours.
Caption Style Settings
The new properties for Table/Figure Caption Name & Style exposes the Word “Field” text and “Style” name used to define and format captions for tables and figures. It is required to update the Word template macro DocumentNew to make these active when exporting the report.
| Caption Style Settings | |
|---|---|
| Caption Align | Default/Left/Center/Right Aligns the caption on the page. |
| Caption Style | Default/Italic (Default)/Bold/Italic Bold Set the caption style. |
| Caption Font | Arial 12pt (Default) |
| Caption only from Figure Text | Yes/No (Default) Create caption from Figure text. (i) |
| Table Caption Location | Top/Bottom (Default) |
| Table Caption Name | “Table {SEQ Table \* ARABIC }. “ Table caption Name and Field text. (ii) |
| Table Caption Style | “Caption,Table_Caption” Table caption Style in selected Word template. (iii) |
| Figure Caption Name | “Figure {SEQ Figure \* ARABIC }. “ Figure caption Name and Field text. (ii) |
| Figure Caption Style | “Figure_Caption” Figure caption Style in selected Word template. (iii) |
(i) Caption only from Figure Text
By default the figure caption is created by combining the name of the Figure and the “Figure text” field. To only use the “Figure Text” set this property to “Yes”.
(ii) Caption Name
The Table/Figure Caption Name contains the Field text string for defining the auto numbering in Word. Press “Alt + F9” in Word to toggle the view of existing Fields.

(iii) Caption Style
The Table/Figure Caption Style name must exist in the selected Word template AND the macro DocumentNew must be updated accordingly. Use “None” to use the Caption Style instead.
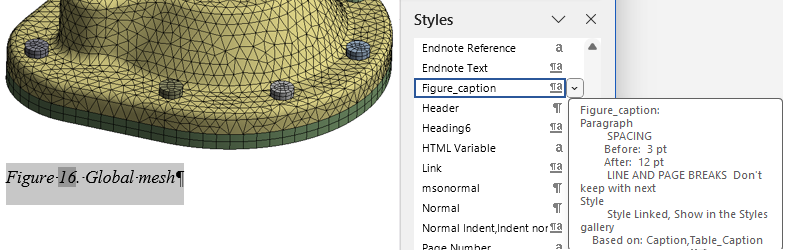
Image Export Settings
The definition of image export is now only made in the Report Settings object independent of the Mechanical Settings. The naming and options are the same as before as used in Mechanical. The Word template macro DocumentNew contains updates to fix the aspect ratio and resize static Images larger than the page width. Figures are exported in correct size using the settings below. The option Image Border enables borders on all images in the Word document, and further customization can be in the DocumentNew macro.
| Image Export Settings | |
|---|---|
| Use Current Display | No (Default)/Yes “Yes” uses screen capture and ignore the settings. |
| Graphics Resolution | Optimal Onscreen Display (1:1)/Enhanced Print Quality (2:1) (Default)/HighResolution Print Quality (4:1) |
| Capture | Image and Legend (Default)/Image Only |
| Background | White (Default)/Graphics Appearance Settings |
| Font Magnification Factor | 1 (Default) Scale font size in figures. Range from 0.5 to 1.5. |
| Graphics Width | 640 (Default) Nominal figure width (in Pixels). |
| Graphics Height | 400 (Default) Nominal figure height (in Pixels). |
| Chart Width | 640 (Default) Nominal chart width (in Pixels). |
| Chart Height | 400 (Default) Nominal chart height (in Pixels). |
| Image Border | Yes/No (Default) Set a border on each Figure/Image/Chart. |
The Graphics Resolution is a scale factor used on the nominal figure dimensions.
Word uses 96 dpi resolution so if the document width is e.g. 17 cm the graphics width should be: 96*(17/2.54) = 640.
Report Layout Settings
The definition of the “Default Sections”, “Tagging” and renaming (optional) of “Model objects” in the report as well as outline level, colours and styles are defined in the Report Layout Settings.
| Report Layout Settings | |
|---|---|
| Default Comments | Tabular Editor to create Default Comments names and order. |
| Model Objects | Tabular Editor to select Model tree Objects to be automatically “tagged” and renamed and set the report outline Level. |
Default Comments defines a list of the Project level headings and where in this list the “Model Tree” is placed in the report. For each “Comment” there can be a corresponding “CommentName.html” file saved in the extension folder that contains the default text. Use the Comment Feature Save Default Comment Text to save or update the selected comment text.
Starting in 2026R1 each Word template may have unique default comments by appending the template name to the html file name, i.e. the “Introduction” for “Technical_Report.dotm” is saved as: “Introduction_Technical_Report.html” when clicking “Save Default Comment Text”.
There can also be “Images” containing the name “CommentName”, e.g. “Introduction_1” that will be added after the comment.
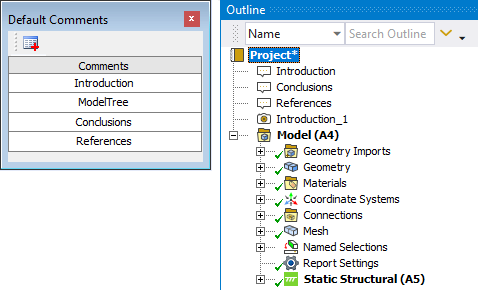
Model Objects defines the list of model tree objects that will be “tagged” when the Report Settings object is added.
For each object a new “Name” may be added (or left blank to use the default name).
The report outline “Level” can be modified, e.g. if “Analysis” should be level 1 (same as “Model”) or level 2 (one level below “Model”). The model objects that is not defined in this list will take the Outline Level according to their relative position in the model tree.
You need to “Save Report Settings” to see the effect of these properties in the GUI.
General Settings
| General Settings | Description |
|---|---|
| Check for new version at start | Yes (Default)/No Enable/Disable app version check at start. |
| Default Report Template | Name of Word report template and settings to be used when adding Report Settings. |
| Microsoft Word path | Path to “WINWORD.EXE”. Click to locate file. |
| Background Colours | Tabular Editor to add/remove colours for Table Headerline Colour. |
| Font Styles | Tabular Editor to add/remove font styles available in Font Style Settings and Table Font. |
| Table Styles | Tabular Editor to add/remove table border and styles available in Table Style |
Background Colours defines the Name, Colour Code and Invert text for the Table Headerline Colour.
Font Styles and Table Styles defines the Name and HTML Code for the corresponding Font Style Settings and Table Style Settings.

The “Background Colors”, “Font Styles” and “Table Styles” are saved in the file “reportGeneratorPref.json” and are used instead of the data stored in the file reportGeneratorDiacritics.py.
License Settings
| License Settings | |
|---|---|
| Edit License Settings | Yes/No (Default) If “Yes” displays the following properties. |
| Customer ID | Used to update and save the Customer ID provided by EDRMedeso. |
| License Key | Used to update and save the License Key provided by EDRMedeso. |
| License borrowing time (days) | 0 <= time <= 31 days (Default 1). |
Select “Edit License Settings = Yes” to edit the Customer ID, License Key and License borrowing time.
Select “Edit License Settings = No” to prevent the “?” on Weld Settings from an “Invalid License Key” if the license is unavailable.
Use “Check License Status” to show current users and update the License Key status.
The Customer ID and License Key credentials are saved in the Windows “User variables” and are loaded automatically when the app is started. The fields Customer ID and Licence Key displays the values partly hidden (obfuscated). The license settings are not saved with the project to prevent the credentials to accidentally be revealed if the project is shared.
When entering a new value the system “User variables” are updated and validated. Entering “0” will reset the saved values and disable the license for the current user.
If the “License borrowing time = 0” the license is not checked out when Mechanical starts.
If the “License borrowing time = 1” the license is checked out (if possible) when Mechanical starts and released when Mechanical is closed.
If the “License borrowing time > 1” the license is kept checked out on the PC for the defined number of days (even if Mechanical is closed).
Clicking the “Active License” button will release the license if needed.
See the Licensing section for more details.