Table of contents
 New Comments
Click “New Comments” to add a comment to all selected objects.
The comment name becomes the heading unless the comment name contains “Comment” (in current language).
You may paste in formatted text from e.g. Word including tables. Also note the text formatting features in the comments window including the option to add images in the text.
 Comment Features
Mechanical uses HTML when formatting text in a “Comment”. If typing HTML specific coding characters, e.g. “&”, “<” and “>” these are replaced by the corresponding HTML character code. For this reason you cannot type in HTML formatting styles but must use the text formatting identifiers instead.
Format Comment
Click “Format Comment” to replace text identifiers with formatting or Greek letters in selected (or all) Comments.
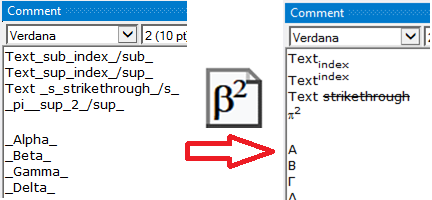
The text identifiers are defined in the dictionary “textFormatDict” in the file reportGeneratorDiacritics.py in the app installation folder. This file can be customized by the user.
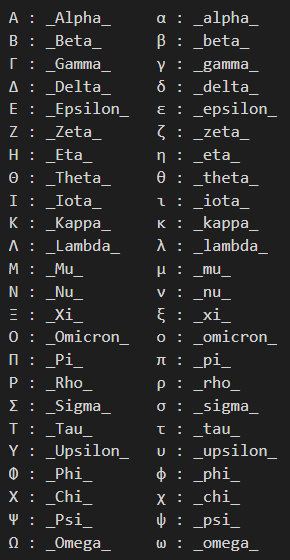
Greek letter identifiers:
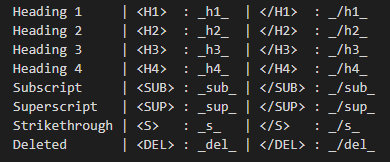
HTML tag text identifiers:
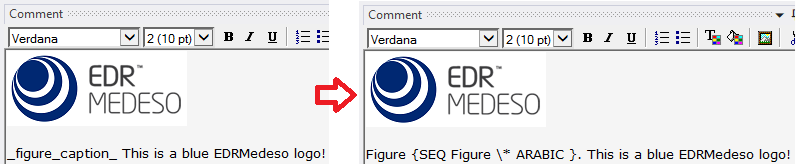
If adding an image or table in the comment you may add the corresponding “Figure caption” or “Table caption” using the text identifiers “_figure_caption_” or “_table_caption_”. You can also use this feature in Edit Report Draft.
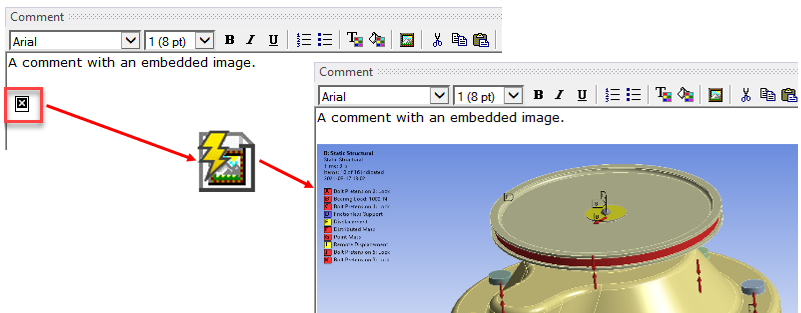
The image must be saved in the “user_files” before adding it in the comment.
Word Fields
Figure and Table captions are created using a “field code”. During the import in Word a string identified with “{…}” is converted to a field using the VBA macro in the Word report template, e.g. ‘Figure {SEQ Figure \* ARABIC }. ‘ Any valid field codes can be added in a comment. Press “Alt+F9” in Word to toggle the view of existing Fields.
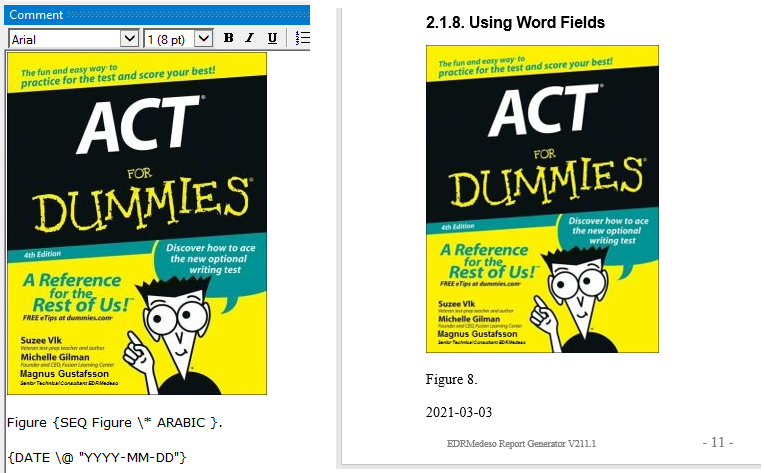
The conversion of field code is done given that the Word template is updated with the latest Document New and TextToFields macros.
Word fields are used when defining Cross-reference to objects.
 Erase All Formatting
Click “Erase All Format” to clear all HTML formatting in selected (or all) Comments.
This is useful if pasting in formatted text from Word or other editors.

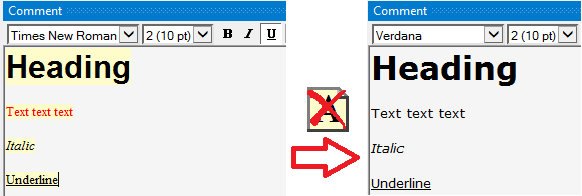
 Erase Font Formatting
Click “Erase Font Format” to clear font HTML formatting in selected (or all) Comments.
This is useful if pasting in formatted text from Word or other editors and you want to keep the outline levels for “Headings” as well as “Italic”, “Bold” etc. but to erase background colour, text colour as well as font size and font name. This feature will also remove the hidden grammar and spelling error HTML tags preventing result Identifiers to work.
 Parameter Table
Click “Parameter Table” to insert a Comment on the selected object with the text identifier “_parameterTable_” for creating a table of all defined parameters in the model.
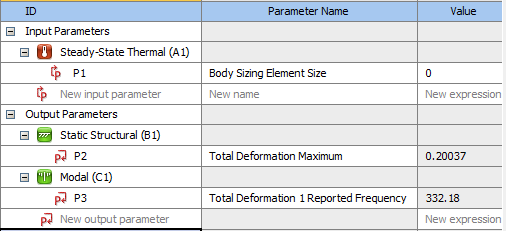
The comment can be at any place in the model tree and can also contain other text. Individual parameters may be used in the text as well.
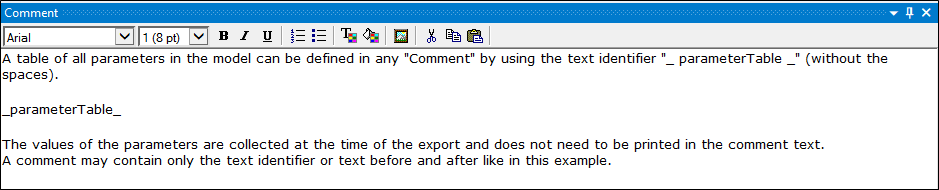
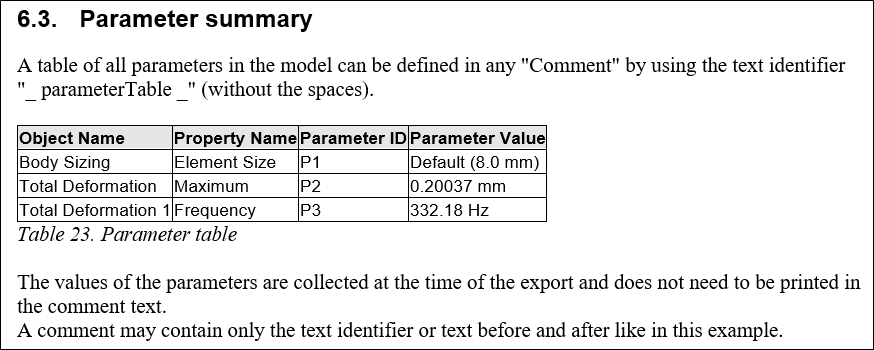
Copy the string “_parameterTable_” and use Clipboard To Cross-reference to get the cross-reference to the table for use in other Comments.
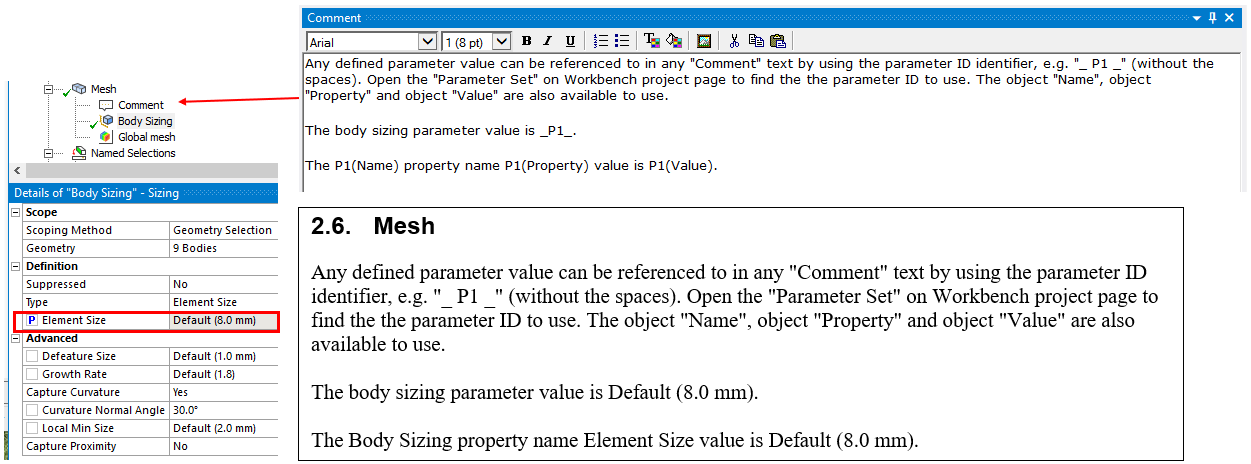
Parameter values using parameter ID
Any parameter value can be referenced to in a text comment by using the parameter ID, e.g. “_P1_”. The object and property name are also available to insert, e.g. “P1(Name)” and “P1(Property)”. The object itself does not need to be tagged in order to use the parameter name.
Identifier Table
Click “Identifier Table” to insert a Comment on the selected object with the text identifier “_identifierTable_” for creating a table of all defined results identifiers in the model. The comment can be at any place in the model tree and can also contain other text.

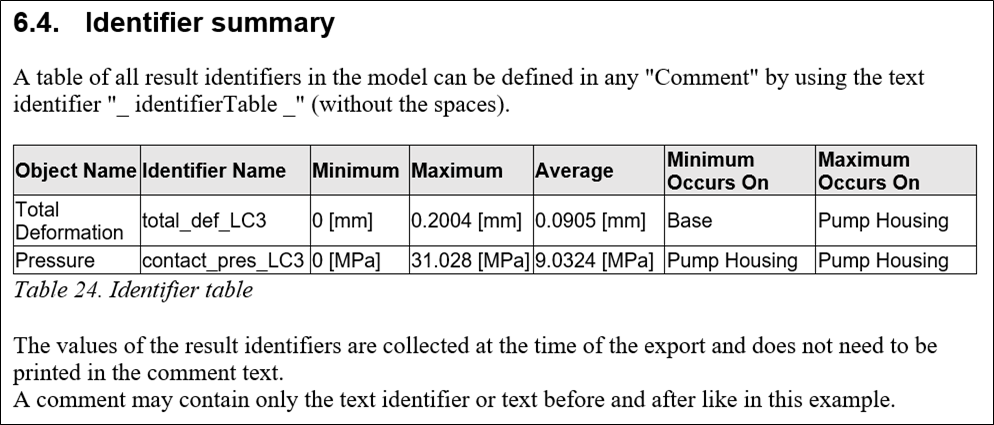
Copy the string “_identifierTable_” and use Clipboard To Cross-reference to get the cross-reference to the table for use in other Comments.
Identifier values in comments
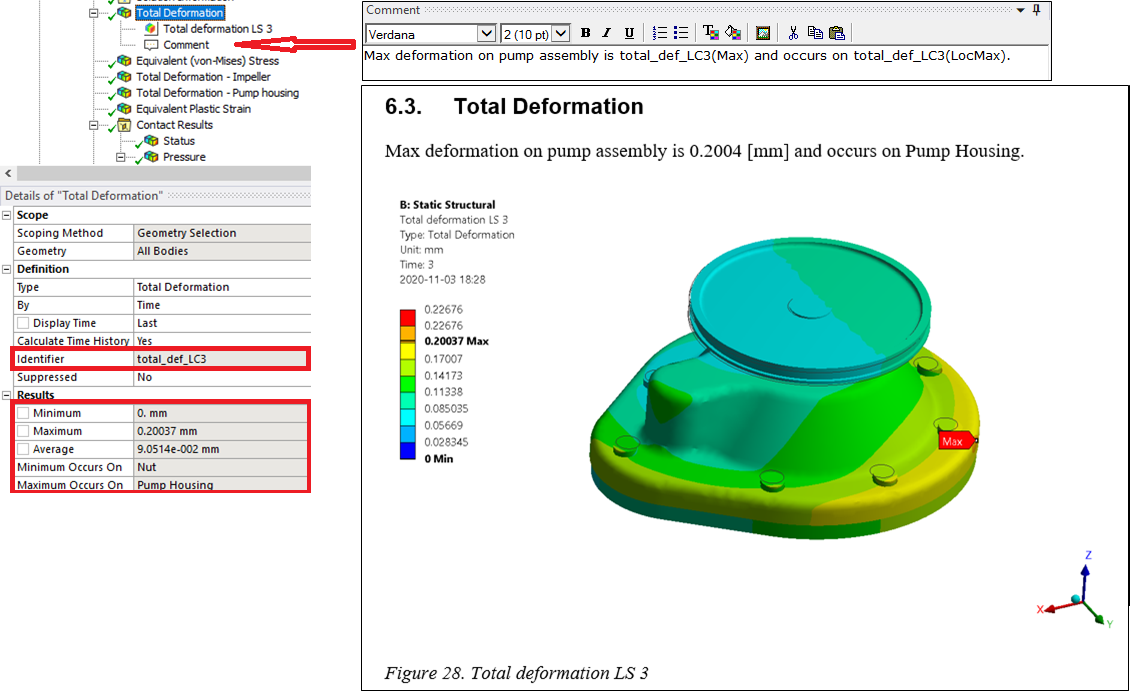
If a result object has an “Identifier”, e.g. “total_def_LC3” the values of “Object Name”, “Minimum”, “Maximum”, “Average”, “Minimum Occurs On” and “Maximum Occurs On” can be inserted in any comment in the model tree using “identifier_name(LAB)” where LAB is one of: Name/Max/Min/Avg/LocMax/LocMin. The result itself does not need to be tagged in order to use the identifier name.
The current analysis system Directory Name, e.g. “SYS-2”, can be referenced to in a comment by using the identifier name “_SYS_”. The Directory Name is also printed in the Analysis Details Summary.

 Update Image Path
Images can be embedded in a comment using the “Insert Image” button in the comment window pane. The link to images are not updated if saving the project in a new name.

Click “Update Image path” to check all comments for embedded images. If an image name exists within the current project the path is updated. All updated comments gets selected in the model tree when finished.
This feature is used if the project is saved in a different location and the images are not shown. It is also used automatic when the report is created.
 Insert Appendix
To make one report from several Mechanical models in different systems start by defining the main report from one of the Mechanical systems.
- For each extra system define a unique “ReportName” e.g. “Appendix A.docx” and only Tag those objects to include. Export a HTML report to the folder “user_files”.
- In the main Mechanical model click the “Insert Appendix” button. This will create an appendix comment with listing of all available html files (except the main report). You may remove or change order of the names.
- Create the report as normal and the selected appendices will be included at the end of the report.

Appendices from other sources are also possible if saved as a html file (with corresponding image folder) in the folder “user_files”.
 Save Default Comment Text
Click “Save Default Comment Text” to save or update the selected Comment as a default text when adding the Default Comments to a new model. The text is saved in a html file in the app installation folder; “CommentName_ReportTemplateName.html”, and is unique for each template (ReportTemplateName.dotm).
This feature is used when customizing your your report setup.
The name of the Comment must also be added in the Report Layout Settings/Default Comments.
You may also edit the html file using an external editor or the Html Editor.
 Bookmark Objects
Select one or more objects in the model tree and click “Bookmark Objects” to rename the object and define a bookmark name.
The Word cross-reference field text string is also copied into the clipboard and can be pasted into any Comment and used to reference to that specific object. If you edit the bookmark name of the object you must use the Tag Report Objects to update the cross-reference field text string in the clipboard.
This action is only needed if you want to create a fixed bookmark in Word for later usage OR if you want to reference to the Figure name, e.g. “Equivalent Stress”, instead of the the caption “Figure 15. “.
Bookmark Name
The bookmark, e.g. “[Mesh#Id15_Sec_Mesh#]” is defined by a starting and closing bracket “[ ]” where the bookmark name is defined by a starting “#Id” and a closing “#]”, e.g. “Id15_Sec_Mesh”. The name must start with “Id”, be max 40 letters long and only contain letters, numbers and underscore (A-Za-z0-9_).
The auto-generated bookmark names uses the “ObjectId” to identify the object in the model tree and make unique names, e.g. “Id15” comes from “Mesh.ObjectId = 15”.
The name also contains a label to make it easier to identify in Word as well as to be able to reference to both the heading and tables of the same object.
- _Sec_: Bookmark of a section (heading)
- _Fig_: Bookmark of a Figure, Image or Chart
- _Tab_: Bookmark of a Table in a load or result object
- _Str_: Bookmark of a text string in a Comment
An object marked with the bookmark brackets “[…]” and a valid name enclosed with “#” will be converted to a bookmark in Word, given that the Word template is updated with the latest macros Document New and TextToBookmarks.
 Remove Bookmarks
Select one or more objects and click “Remove Bookmarks” to remove the bookmark formatting of the name.
You can still Cross-reference to the object in Comments.
 Cross-reference
To cross-reference to any object in the report first select the object and click Tag Report Objects. This will create the bookmark field text string in the clipboard that you may paste into any comment text. If the object is named as a Bookmark “[…]” the bookmark name is extracted otherwise a default bookmark name is created.
The cross-reference bookmark name is defined depending of object type:
- Object heading (Section): “{REF Id123_Sec_ObjectName \h}”
- Object “Details” (Table): “{REF Id123_Tab_Details \h}”
- Object “Summary” (Table): “{REF Id123_Tab_Summary \h}”
- Object “Summary X” (Table): “{REF Id123_Tab_SummaryX \h}”
- Paragraph (String): “{REF Id123_Str_ParagraphName \h}”
- Figure (or Image): “{REF Id123_Fig_FigureName \h}”
- Result object “Tabular data”: “{REF Id123_Tab_TabularData \h}”
The “Id123” is the internal “ObjectId” used to identify the object in the model tree.
The “ObjectName” and “FigureName” may be changed as long as it creates a valid bookmark name.
An object marked with the field brackets “{…}” will be converted to a field in Word. See Word Fields
When the report is created only the objects that has a valid cross-reference will be marked as a Bookmarks. If the cross-reference is pointing to a non-existing object a warning message is printed in the extensions log and you will get “Error! Reference source not found.” in Word.
 Clipboard To Bookmark
A bookmark of a selected text string can be created inside Comments using the “Clipboard To Bookmark” function.
- Select a text string in a Comment and copy to the clipboard (Ctrl+C).
- Use the Clipboard To Bookmark to convert the text in the clipboard to a valid Bookmark string.
- Paste the text back to the Comment (Ctrl+V) to replace the initial text string.
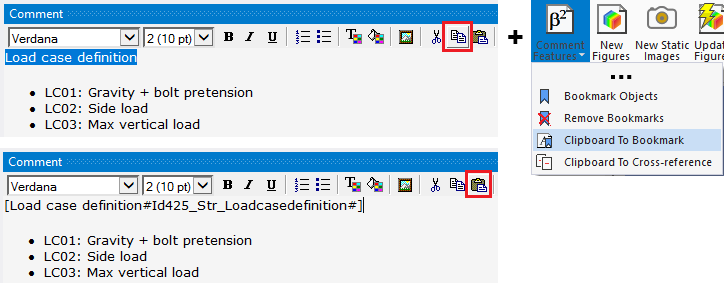
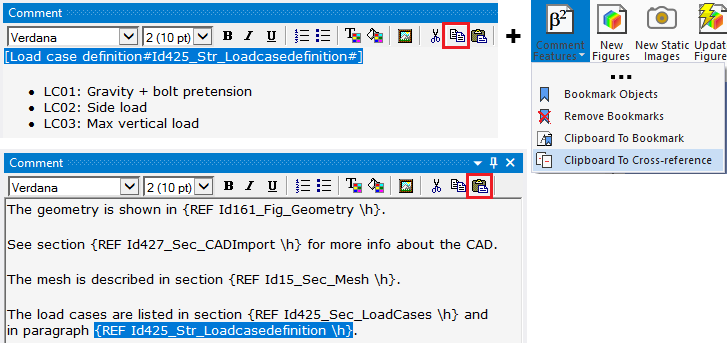
 Clipboard To Cross-reference
A cross-reference to a bookmark text string can be create using the “Clipboard To Cross-reference” function.
- Select a Bookmark text string in a Comment and copy to the clipboard (Ctrl+C).
- Use the Clipboard To Cross-reference to convert the text in the clipboard to a Cross-reference string.
- Paste the text back in any Comment (Ctrl+V).