CSV Plot Scripting
Table of contents
Introduction
To speed up analysis and post processing automation with Mechanical Scripting can be used.
If using existing binary applications, e.g. CSV Plot, the internal names of the properties must be known in order to setup the object.
The process has the following steps:
- Open a project (and install) and activate the app CSV Plot.
- Create the result csv file you want to plot with CSV Plot.
E.g. export text results and edit in Excel and and save as a csv file. - Create a Mechanical script file to define the properties of CSV Plot.
- Run the script in the Mechanical Scripting Console.
- Run the script with Workbench in batch mode (optional).
CSV Plot API
The features of CSV Plot and CSV Map may be called from Mechanical Scripting using the correct Properties and Callbacks.
Default values are printed in italics.
Valid options are listed in between brackets, e.g. [Yes/No].
 CSV Plot
| Property Caption | propName | Type and options | Callback «onvalidate» |
|---|---|---|---|
| Geometry | Geometry | MechanicalSelectionInfo | - |
| CSV File | csvFile | String | onvalidateFile(obj,prop) |
| CSV Filter | csvFilter | String * | - |
| CSV Item | csvItem | String | findCsvUnit(obj,prop) |
| Result Location | rstLoc | String [Node/Element] | setLocation(obj,prop) |
| Calculate Time History | timeHist | String [Yes/No] | setTimeHist(obj,prop) |
| Calculate Max/Min/Avg Over Items | maxminOverItems | String [No/Max Over Items/Min Over Items/Avg Over Items/Item Of Max/Item Of Min] | onvalidateMaxMin(obj,prop) |
 CSV Map
| Property Caption | propName | Type and options | Callback «onvalidate» |
|---|---|---|---|
| Geometry | Geometry | MechanicalSelectionInfo | - |
| CSV File | csvFile | String | changedCsv(obj,prop) |
| CSV Filter | csvFilter | String * | - |
| X Coordinate | csvX | String None | findCsvUnit(obj,prop) |
| Y Coordinate | csvY | String None | findCsvUnit(obj,prop) |
| Z Coordinate | csvZ | String None | findCsvUnit(obj,prop) |
| Coordinate System | coordSys | CoordinateSystem | validateCsys(obj,prop) |
| Show CSV Grids | showGrids | String [Yes/No] | validateCsys(obj,prop) |
| Map quality | mapLimit | String [5/10/15/20/25] | changeMapLimit(obj,prop) |
| CSV Item | csvItem | String | findCsvUnit(obj,prop) |
| Result Location | rstLoc | String [Node/Element] | setLocation(obj,prop) |
| Calculate Time History | timeHist | String [Yes/No] | setTimeHist(obj,prop) |
| Calculate Max/Min/Avg Over Items | maxminOverItems | String [No/Max Over Items/Min Over Items/Avg Over Items/Item Of Max/Item Of Min] | onvalidateMaxMin(obj,prop) |
 CSV Vector
| Property Caption | propName | Type and options | Callback «onvalidate» |
|---|---|---|---|
| Geometry | Geometry | MechanicalSelectionInfo | - |
| CSV File | csvFile | String | onvalidateFile(obj,prop) |
| CSV Filter | csvFilter | String * | - |
| CSV Item X | csvItemX | String | findCsvUnit(obj,prop) |
| CSV Item Y | csvItemY | String | findCsvUnit(obj,prop) |
| CSV Item Z | csvItemZ | String | findCsvUnit(obj,prop) |
| Result Location | rstLoc | String [Node/Element] | setLocation(obj,prop) |
| Calculate Time History | timeHist | String [Yes/No] | setTimeHist(obj,prop) |
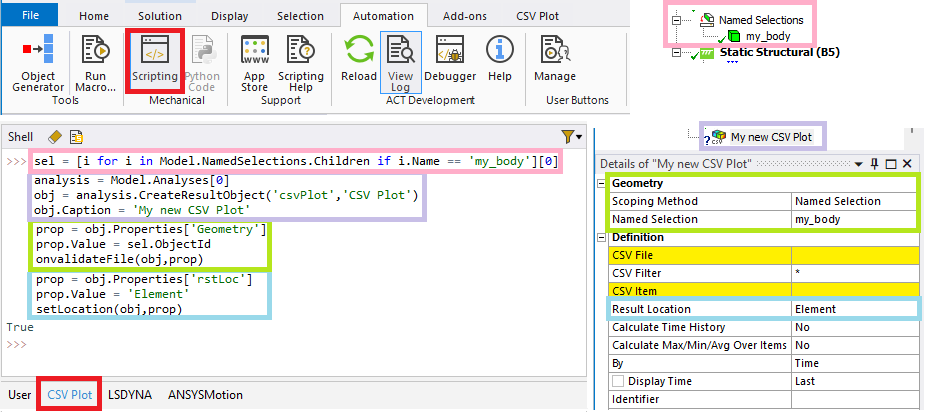
Mechanical scripting example
Below is a sample code for creating and defining the properties of a CSV Plot and CSV Map object.
The csv file to use is saved in the project “user_files” folder.
Click the “Clipboard” icon in the upper right corner of the code block below to copy the text to your editor.
// Mechanical_Scripting.py
# Create selection object from current selection
sel = ExtAPI.SelectionManager.CurrentSelection
# Or Create a selection from a selected Named Selectione
sel = [i for i in Model.NamedSelections.Children if i.Name == 'my_body'][0]

# Create analysis object
analysis = Model.Analyses[0]

# Get user_files folder
import os
workingDir = analysis.WorkingDir
for i in range(4): workingDir = os.path.split(workingDir)[0]
user_files = os.path.join(workingDir,'user_files')

# CSV Plot specific properties
obj = analysis.CreateResultObject("csvPlot","CSV Plot")
obj.Caption = "My new CSV Plot"
obj.Properties["Geometry"].Value = sel.ObjectId
obj.Properties["csvFile"].Value = os.path.join(user_files,"Brick_seqv_node.csv")
onvalidateFile(obj, obj.Properties["csvFile"])
obj.Properties["csvItem"].Value = "Set 2 Equivalent (von-Mises) Stress (MPa)"
findCsvUnit(obj, obj.Properties["csvItem"])
obj.Properties["rstLoc"].Value = "Node"
setLocation(obj, obj.Properties["rstLoc"])
obj.Properties["timeHist"].Value = "No"
setTimeHist(obj, obj.Properties["timeHist"])
obj.Properties["maxminOverItems"].Value = "No"
onvalidateMaxMin(obj, obj.Properties["maxminOverItems"])

# Define by result time
obj.By = obj.By.Time
obj.DisplayTime = Quantity(2,"sec")
# Or Define by result set
obj.By = obj.By.ResultSet
obj.SetNumber = 2

# Evaluate result
analysis.Solution.EvaluateAllResults()

# CSV Map specific properties
obj = analysis.CreateResultObject("csvMap","CSV Plot")
obj.Caption = "My new CSV Map"
obj.Properties["Geometry"].Value = sel.ObjectId
obj.Properties["csvFile"].Value = os.path.join(user_files,"Tet_seqv_node.csv")
changedCsv(obj, obj.Properties["csvFile"])
obj.Properties["csvX"].Value = "X Location (mm)"
findCsvUnit(obj, obj.Properties["csvX"])
obj.Properties["csvY"].Value = "Y Location (mm)"
findCsvUnit(obj, obj.Properties["csvY"])
obj.Properties["csvZ"].Value = "Z Location (mm)"
findCsvUnit(obj, obj.Properties["csvZ"])
csys = Model.CoordinateSystems.Children[0]
obj.Properties["coordSys"].Value = csys.ObjectId
validateCsys(obj, obj.Properties["coordSys"])
obj.Properties["showGrids"].Value = "No"
obj.Properties["mapLimit"].Value = "5"
obj.Properties["csvItem"].Value = "Set 1 Equivalent (von-Mises) Stress (MPa)"
findCsvUnit(obj, obj.Properties["csvItem"])
obj.Properties["rstLoc"].Value = "Node"
setLocation(obj, obj.Properties["rstLoc"])
obj.Properties["timeHist"].Value = "No"
setTimeHist(obj, obj.Properties["timeHist"])

# Define by result time
obj.By = obj.By.Time
obj.DisplayTime = Quantity(1,"sec")
# Or Define by result set
obj.By = obj.By.ResultSet
obj.SetNumber = 1

# Evaluate result
analysis.Solution.EvaluateAllResults()

Tree.Refresh()
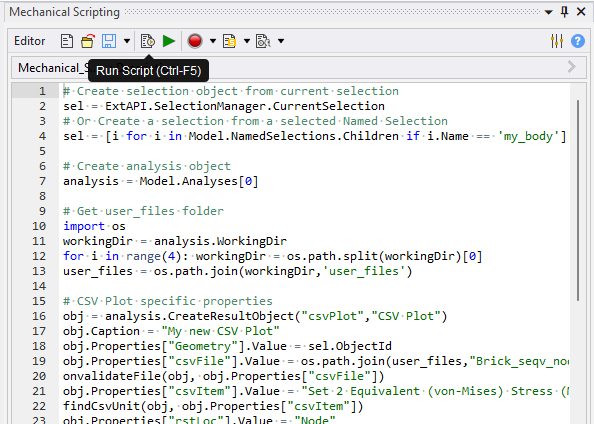
Mechanical scripting console
Open the script file in the Mechanical Scripting console and run it.
Workbench Scripting
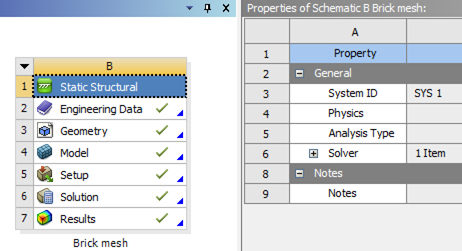
Mechanical scripting and ACT app functions can be launched in a selected analysis system by using Workbench journaling.
Below is a sample code to load the Mechanical scripting file and run it in one of the analysis systems using the functions of the extension “CSV Plot”.
User must identify and edit the “System ID” (“SYS 1” in this case) and the “/path/to/the/scripting/file/Mechanical_Scripting.py”.
// WB_Scripting.py
system1 = GetSystem(Name="SYS 1")
model1 = system1.GetContainer(ComponentName="Model")
model1.Edit()
fs = open(r"C:/path/to/the/scripting/file/Mechanical_Scripting.py",'r')
commands = fs.readlines()
fs.close()
commandText = "".join(commands)
model1.SendCommand(Language='Python', Command=commandText, ExtensionName='CSV Plot')
model1.Exit()
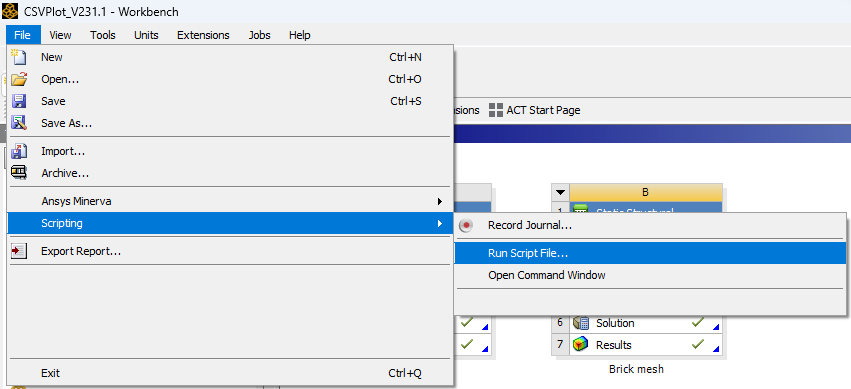
Run the script from Worbench menu: File/Scripting/Run Script File….
Workbench in Batch mode
Below is a sample journal code to run Workbench in batch mode and call the Mechanical scripting file. User must edit the “FilePath” to the project file “/path/to/the/project/file/CSVPlot_V231.1.wbpj” and the “/path/to/the/scripting/file/Mechanical_Scripting.py”.
// WB_Scripting.wbjn
# encoding: utf-8
# 2023 R1
SetScriptVersion(Version="23.1.153")
Open(FilePath="C:/path/to/the/project/file/CSVPlot_V231.1.wbpj")
try:Extensions.LoadExtension(Id="81c1c629-b62c-498a-85c7-7cdb25adbdc5",Version="231.1",Format="Binary")
except:pass
system1 = GetSystem(Name="SYS 1")
model1 = system1.GetContainer(ComponentName="Model")
model1.Edit()
fs = open(r"C:/path/to/the/scripting/file/Mechanical_Scripting.py",'r')
commands = fs.readlines()
fs.close()
commandText = "".join(commands)
model1.SendCommand(Language='Python', Command=commandText, ExtensionName='CSV Plot')
model1.Exit()
Save(Overwrite=True)
Start a “Command Prompt” in the directory of the “WB_Scripting.wbjn” file and run the following command using Ansys 2023R1 (v231):
‘“C:\Program Files\ANSYS Inc\v231\Framework\bin\Win64\RunWB2.exe” –X –R WB_Scripting.wbjn’
